
By reading this article, you will learn how to use the train_test_split() -function from the scikit-learn library to split your Pandas Dataframe dataset into train and test sets. The training set can then be utilized for training machine learning models, and the test set can be used to test the performance/accuracy of the resulting model.
Creating test and train samples from a dataframe is a common step in the machine learning workflow. You can do this using pandas for data manipulation and scikit-learn for splitting the data.
If you only want the 10-second instructions on how to split the dataframe object, here it is:
# Import necessary libraries
import pandas as pd
from sklearn.model_selection import train_test_split

# Load your data into dataframe
df = pd.read_csv('your_dataset.csv')

# Prepare features and target
X = df.drop('target_column', axis=1)  # Features
y = df['target_column']  # Target

# Split the data
X_train, X_test, y_train, y_test = train_test_split(X, y, test_size=0.2)
In a typical machine learning workflow, it is common to utilize a validation dataset (separate from both the test and train datasets) to compare the performance of different candidate models. The test set is then used in the end to evaluate the selected model in the end with completely new data so that overfitting can be minimized. You will also learn how to do this by reading this article.
Table of contents:
- Creating an Example Dataset
- Import Required Libraries and Load Your Data into a DataFrame
- Prepare Features and Target (Labels) and Split the Data
- Verify the Split
- Arguments of train_test_split() for Advanced Use
- Split the Data Further into a Train, Validation, and Test Set
1. Creating an Example Dataset
You likely already have some dataset you wish to split into the test and train sets, but for the sake of example, I will start by saving the Iris example dataset from scikit-learn to .csv -file. The Iris dataset is a well-known example dataset in machine learning and statistics that consists of 150 samples from three species of Iris flowers (Iris setosa, Iris virginica, and Iris versicolor), with four features measured from each sample: the lengths and the widths of the sepals and petals.
By saving this dataset to a .csv -file I can use this dataset for the examples required in this article. The Iris dataset can be loaded by using Scikit-Learn, then it can be converted to a pandas DataFrame, and then saved to a CSV file with the following steps:
Step 1: Import Required Libraries
import pandas as pd
from sklearn.datasets import load_iris
Step 2: Load the Iris Dataset
iris = load_iris()
df = pd.DataFrame(data=iris.data, columns=iris.feature_names)
df['target'] = iris.target
In the code above, iris.datairis.feature_namesiris.target
Step 3: Save the DataFrame to a CSV File
df.to_csv('iris_dataset.csv', index=False)
Here, the to_csviris_dataset.csv. The index=False
After running these commands, you should find a file named iris_dataset.csv in your current working directory, containing the Iris dataset. Opening this file with Excel (and doing some Text to Columns action) this file should look something like this:
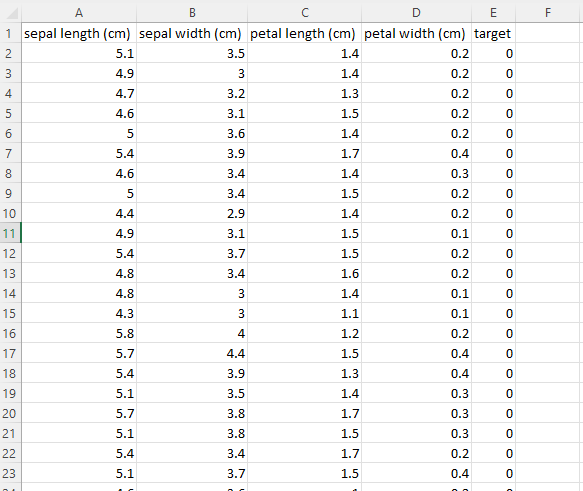
In this image we have the features in the 4 first columns, and the label (encoded to numbers 0-2 corresponding to the three different Iris species) in the final column.
By running the code above we now have the example dataset in our working directory, so let’s get to the meet and potatoes of this article!
2. Import Required Libraries and Load Your Data into a DataFrame
First, you need to import the necessary libraries. Make sure you have them installed in your Python environment. You can install them using pip if you haven’t already:
pip install pandas scikit-learn
Now, import the libraries in your Python script and load your dataset into a pandas DataFrame. You can do this using various functions like pd.read_csv(), pd.read_excel(), etc., depending on the format of your data.
import pandas as pd
from sklearn.model_selection import train_test_split

df = pd.read_csv('iris_dataset.csv') # Import your dataset (I'm importing the Iris dataset I just saved earlier)
Running this code, you now have loaded your datset into a pandas DataFrame object.
3. Prepare Features and Target (Labels) and Split the Data
Separate your features (independent variables) and target (dependent variable) into two different data structures. Then use train_test_split() from scikit-learn to split the data into training and test sets. You can specify the ratio of test data with the test_size argument and set a random seed for reproducibility with the random_state argument.
X = df.drop('target', axis=1)  # Features (remember to use the name of the target column in your data, for my dataset it is simply 'target')
y = df['target']  # Target or labels

X_train, X_test, y_train, y_test = train_test_split(X, y, test_size=0.2, random_state=42)
In the above code:
Xytest_size=0.2random_state=42
4. Verify the Split
You can verify you got the split that you are expecting by checking the shape of the resulting dataframes. You can also perform further verification by checking some datapoints:
# Check the shape of the dataframes:
print("Training set shapes:", X_train.shape, y_train.shape)
print("Test set shapes:", X_test.shape, y_test.shape)

#Check some datapoints:
print("\nSome features from the training set:")
print(X_train)

print("\nSome labels from the training set:")
print(y_train)
If you are following my example, you should get the following output:
Training set shapes: (120, 4) (120,)
Test set shapes: (30, 4) (30,)

Some features from the training set:
     sepal length (cm)  sepal width (cm)  petal length (cm)  petal width (cm)
22                 4.6               3.6                1.0               0.2
15                 5.7               4.4                1.5               0.4
65                 6.7               3.1                4.4               1.4
11                 4.8               3.4                1.6               0.2
42                 4.4               3.2                1.3               0.2
..                 ...               ...                ...               ...
71                 6.1               2.8                4.0               1.3
106                4.9               2.5                4.5               1.7
14                 5.8               4.0                1.2               0.2
92                 5.8               2.6                4.0               1.2
102                7.1               3.0                5.9               2.1

[120 rows x 4 columns]

Some labels from the training set:
22     0
15     0
65     1
11     0
42     0
      ..
71     1
106    2
14     0
92     1
102    2
Name: target, Length: 120, dtype: int64
Now, you have your data split into training and test sets, and you are ready to proceed with building and evaluating your machine learning model.
5. Arguments of train_test_split() for Advanced Use
The train_test_split
- *arrays
- test_size
- train_size
- random_state
- shuffle
- stratify
1. What is the *arrays parameter and how to use it?
In short, these are the arrays to be split into train and test sets. Allowed inputs are lists, numpy arrays, scipy-sparse matrices, or pandas dataframes.
- Type: sequence of indexables with same length / shape[0]
- Usage:
train_test_split(X, y)Xis your feature matrix andy
2. What is the test_size parameter and how to use it?
In short, test_size determines the proportion of the dataset that should be included in the test split. If it is a float, it should be between 0.0 and 1.0. If it is an int, it represents the absolute number of test samples.
- Type: float or int, default=None
- Usage:
train_test_split(X, y, test_size=0.2)
3. What is the train_size parameter and how to use it?
In short, train_size determines the proportion of the dataset that should be included in the training split. If it is a float, it should be between 0.0 and 1.0. If it is an int, it represents the absolute number of train samples.
- Type: float or int, default=None
- Usage:
train_test_split(X, y, train_size=0.8)
4. What is the random_state parameter and how to use it?
In short, random_state controls the shuffling applied to the data before applying the split. Providing an int ensures reproducible output across multiple function calls.
- Type: int, RandomState instance or None, default=None
- Usage:
train_test_split(X, y, random_state=42)
5. What is the shuffle parameter and how to use it?
In short, shuffle determines whether or not to shuffle the data before splitting.
- Type: bool, default=True
- Description: Whether or not to shuffle the data before splitting.
- Usage:
train_test_split(X, y, shuffle=False)
6. What is the stratify parameter and how to use it?
In short, stratify ensures that the data is split in a stratified fashion, using the provided array as class labels. “Stratify” refers to ensuring that the proportions of different classes (or outcomes) in the dataset are maintained consistently across both training and test sets when splitting the data. This is particularly important for imbalanced datasets to ensure that all classes are adequately represented in both subsets. Here is a helpful diagram of what this means:

- Type: array-like or None, default=None
- Usage:
train_test_split(X, y, stratify=y)
Example Usage:
X_train, X_test, y_train, y_test = train_test_split(
    X, y,
    test_size=0.2,
    train_size=0.8,
    random_state=42,
    shuffle=True,
    stratify=y
)
In the above example, 80% of the data is used for training, 20% for testing, the data is shuffled before splitting, and the split is stratified based on the class labels in y. The random_state
Remember, test_sizetrain_sizestratifytest_sizetrain_sizetrain_sizeshuffle
6. Split the Data Further into a Train, Validation, and Test Set
To split your dataset into training, validation, and test sets, you can use the train_test_split
Step 1: Import Required Libraries, Load Your Dataset, and Prepare Features and Target
First, you need to import the necessary libraries. Ensure you have them installed in your Python environment. Next, load your dataset into a pandas DataFrame. Adjust the file path and method according to your dataset’s format and location. Finally, separate your features (independent variables) and target (dependent variable).
import pandas as pd
from sklearn.model_selection import train_test_split

df = pd.read_csv('your_dataset.csv')

X = df.drop('target_column', axis=1)
y = df['target_column']
Step 2: Split the Data into Training and Temp Sets
First, you need to split your data into a training set and a temporary set (which will be further split into validation and test sets).
X_train, X_temp, y_train, y_temp = train_test_split(X, y, test_size=0.4, random_state=42)
In the example above, 60% of the data goes to the training set, and 40% goes to the temporary set.
Step 3: Split the Temp Set into Validation and Test Sets
Next, split the temporary set into validation and test sets. If you want them to be the same size, set test_size=0.5.
X_val, X_test, y_val, y_test = train_test_split(X_temp, y_temp, test_size=0.5, random_state=42)
In this example, 20% of the original data goes to the validation set, and 20% goes to the test set.
Step 4: Verify the Splits
You might want to verify the splits by checking the shapes of the resulting datasets.
print("Training set:", X_train.shape, y_train.shape)
print("Validation set:", X_val.shape, y_val.shape)
print("Test set:", X_test.shape, y_test.shape)
If you follow my example from before, and replace the 'your_dataset.csv' from step 1 with 'iris_dataset.csv' and run this code, you should get the following output:
Training set: (90, 4) (90,)
Validation set: (30, 4) (30,)
Test set: (30, 4) (30,)
Now you have successfully split your dataset into training (60%), validation (20%), and test (20%) sets. You can adjust the test_sizerandom_state