Label encoding is a data preprocessing technique used in machine learning to convert categorical values into numerical form, facilitating their use in algorithms that require numerical input. In label encoding, each category is assigned a unique integer based on alphabetical ordering, frequency, or any other criteria deemed appropriate for the task at hand. For instance, in a dataset with a categorical feature having three categories—‘Red’, ‘Blue’, and ‘Green’—label encoding might convert these to 0, 1, and 2, respectively.
Here is a helpful diagram of what exactly this means:
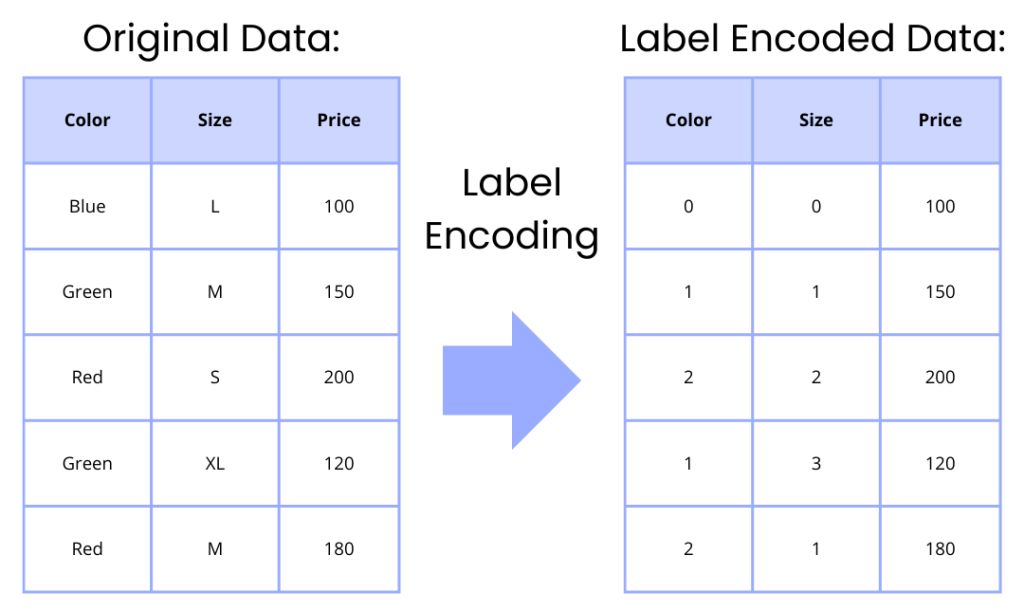
Table of Contents:
- Label Encoding Across Multiple Columns in Scikit-Learn
- A deeper dive to the workings of LabelEncoder
- Feature Encoding Across Multiple Columns
1. Label Encoding Across Multiple Columns in Scikit-Learn
In the following example, we have a DataFrame object with three columns: ‘Color’, ‘Size’, and ‘Price’. The ‘Color’ and ‘Size’ columns are categorical, while the ‘Price’ column is numerical. We will perform label encoding on the ‘Color’ and ‘Size’ columns so that they can be used in machine learning. Luckily, scikit-learn comes with a handy class called LabelEncoder that can be used to do this.
import pandas as pd
from sklearn.preprocessing import LabelEncoder

# Creating a sample DataFrame
data = {
    'Color': ['Blue', 'Green', 'Red', 'Green', 'Red'],
    'Size': ['L', 'M', 'S', 'XL', 'M'],
    'Price': [100, 150, 200, 120, 180]
}
df = pd.DataFrame(data)

# Displaying the original DataFrame
print("Original DataFrame:")
print(df)

# Initializing LabelEncoder
le = LabelEncoder()

# Applying LabelEncoder on categorical columns
df['Color'] = le.fit_transform(df['Color'])
df['Size'] = le.fit_transform(df['Size'])

# Displaying the DataFrame after label encoding
print("\nDataFrame after Label Encoding:")
print(df)
By running this code, you should get the following output:
Original DataFrame:
   Color Size  Price
0   Blue    L    100
1  Green    M    150
2    Red    S    200
3  Green   XL    120
4    Red    M    180

DataFrame after Label Encoding:
   Color  Size  Price
0      0     0    100
1      1     1    150
2      2     2    200
3      1     3    120
4      2     1    180
As we can see, the ‘Color’ and ‘Size’ columns are transformed from categorical data to numerical labels in the following manner:
- Colors
- All ‘Red’ values are converted to the integer 2.
- All ‘Green’ values are converted to the integer 1.
- All ‘Blue’ values are converted to the integer 0.
- Sizes
- All ‘S’ values are converted to the integer 2.
- All ‘M’ values are converted to the integer 1.
- All ‘L’ values are converted to the integer 0.
- All ‘XL’ values are converted to the integer 3.
We do not encode the ‘Price’ column, as it is already numerical, so it remains unchanged. The fit_transformLabelEncoderLabelEncoder
In this example, label encoding was performed on two columns, but similar syntax can of course be used to perform it on any number of columns.
As a side note, you can use a little bit different syntax to achieve the exact same thing in fewer lines of code, if you are only interested in the encoding part (foreshadowing…):
import pandas as pd
from sklearn.preprocessing import LabelEncoder

# Creating a sample DataFrame
data = {
    'Color': ['Blue', 'Green', 'Red', 'Green', 'Red'],
    'Size': ['L', 'M', 'S', 'XL', 'M'],
    'Price': [100, 150, 200, 120, 180]
}
df = pd.DataFrame(data)

# Displaying the original DataFrame
print("Original DataFrame:")
print(df)

# Perform label encoding on Color and Size columns
df[['Color', 'Size']] = df[['Color', 'Size']].apply(LabelEncoder().fit_transform)

# Displaying the DataFrame after label encoding
print("\nDataFrame after Label Encoding:")
print(df)
2. A deeper dive to the workings of LabelEncoder
LabelEncoder is a utility class in scikit-learn’s preprocessing module, used to convert categorical values into numerical labels. Here is a summary of its methods:
fit(y)fityclasses_transform(y)fitmethod has been called,transformcan be used to transform the categorical values inyinto numerical labels. The argumentyis the array-like structure of categorical values that you want to transform. This method returns an array of the transformed labels.fit_transform(y)fittransformyinverse_transform(y)yget_params(deep=True)deepparameter, if set toTrue, will return the parameters for this estimator and contained subobjects that are estimators. This is particularly useful for getting the configuration of an estimator in a pipeline.set_params(**params)classes_
Below is an example where the methods fit(y)transform(y)inverse_transform(y)LabelEncoder
from sklearn.preprocessing import LabelEncoder

# Initializing the LabelEncoder
le = LabelEncoder()

# Sample data
colors = ['Red', 'Blue', 'Green', 'Red', 'Green']

# Fitting the label encoder
le.fit(colors)
print("Classes found:", le.classes_)

# Transforming the categories to numerical labels
encoded_labels = le.transform(colors)
print("Encoded Labels:", encoded_labels)

# Inverse transforming the numerical labels back to categories
decoded_labels = le.inverse_transform(encoded_labels)
print("Decoded Labels:", decoded_labels)
In this example, the fittransforminverse_transform
Classes found: ['Blue' 'Green' 'Red']
Encoded Labels: [2 0 1 2 1]
Decoded Labels: ['Red' 'Blue' 'Green' 'Red' 'Green']
It’s important to note that LabelEncoderfit(X, y)OrdinalEncoder
An Important Note on Saving the LabelEncoder
There are several reasons to save your LabelEncoder after fitting:
- Consistent Transformations: When you are working with machine learning models, it’s crucial to apply the same transformations to the new data as were applied to the training data. If you don’t save the
LabelEncoder - Easy Deployment: When deploying a machine learning model into production, the preprocessing steps, including label encoding, need to be applied to incoming data before making predictions. Saving the
LabelEncoder - Reproducibility: Saving the preprocessing objects, including
LabelEncoder - Inverse Transformation for Interpretability: After making predictions on encoded data, you might want to convert the predictions (or some features) back to the original categorical format for interpretation or reporting purposes. Having the saved
LabelEncoder - Efficiency: Fitting a
LabelEncoder
Saving the LabelEncoder
You can save a LabelEncoderjoblib or pickle. Here is an example of how you might save and load a LabelEncoderjoblib:
import joblib
from sklearn.preprocessing import LabelEncoder

# Creating and fitting the LabelEncoder
le = LabelEncoder()
data = ['Red', 'Green', 'Blue']
le.fit(data)

# Transforming data with the original LabelEncoder
transformed_data = le.transform(data)

# Saving the LabelEncoder to a file
joblib.dump(le, 'label_encoder.joblib')

# Later on, loading the LabelEncoder from the file
loaded_le = joblib.load('label_encoder.joblib')

# Transforming data with the loaded LabelEncoder
loaded_transformed_data = loaded_le.transform(data)

# Verifying that transformations are identical
transformations_equal = (transformed_data == loaded_transformed_data).all()

print("Are the transformations identical?", transformations_equal)
This approach ensures that you can reuse the exact same LabelEncoder
Are the transformations identical? True3. Alternatives to LabelEncoder for Feature Encoding
As LabelEncoder is intended to be used on categorical labels, and not features, there are other, similar, classes for handling features.
Ordinal Encoding
Here are some reasons to use OrdinalEncoder instead of LabelEncoder:
- Intended for encoding features:
LabelEncoder - Preserving Ordinal Nature: When the categorical variables have an ordinal relationship (where the order of the categories matters),
OrdinalEncoder
Below is an example of how to use OrdinalEncoder
import pandas as pd
from sklearn.preprocessing import OrdinalEncoder

# Sample DataFrame
data = {
    'Color': ['Red', 'Green', 'Blue', 'Green', 'Red'],
    'Size': ['S', 'M', 'L', 'S', 'XL'],
    'Price': [100, 150, 200, 120, 180]
}
df = pd.DataFrame(data)

print("Original data:\n", df)

# Initializing OrdinalEncoder
encoder = OrdinalEncoder(categories=[['Red', 'Green', 'Blue'], ['S', 'M', 'L', 'XL']])

# Fitting and transforming the features
encoded_data = encoder.fit_transform(df[['Color', 'Size']])

# Creating a DataFrame with the encoded data
encoded_df = pd.DataFrame(encoded_data, columns=['Color', 'Size'])

# Adding the 'Price' column back to the DataFrame
final_df = pd.concat([encoded_df, df['Price']], axis=1)

print("\nEncoded data:\n", final_df)
In this example, the ‘ColorSizedfOrdinalEncodercategories
Original data:
    Color Size  Price
0    Red    S    100
1  Green    M    150
2   Blue    L    200
3  Green    S    120
4    Red   XL    180

Encoded data:
    Color  Size  Price
0    0.0   0.0    100
1    1.0   1.0    150
2    2.0   2.0    200
3    1.0   0.0    120
4    0.0   3.0    180
After running this code, ‘final_dfcategories
One-hot encoding
While ordinal encoding is straightforward and efficient in terms of computational resources, it can introduce ordinality where none exists, potentially leading to misinterpretation by the machine learning model. This means that even though ‘Red’, ‘Blue’, and ‘Green’ are simply distinct categories without any inherent order, the model might interpret them as having an ordinal relationship, with ‘Green’ > ‘Blue’ > ‘Red’. To address this issue, one might use one-hot encoding or similar techniques that do not introduce unintended ordinal relationships.
In one-hot encoding, each unique category in the data is represented as a binary vector. For a particular data point, the vector corresponding to its category is set to 1, and all other vectors are set to 0. The number of vectors depends on the number of unique categories in the data.
For example, consider a dataset with a categorical feature ‘Color’ that has three categories: Red, Green, and Blue. Using one-hot encoding, we represent each color as a binary vector:
- Red: [1, 0, 0]
- Green: [0, 1, 0]
- Blue: [0, 0, 1]
This method eliminates any ordinal relationship that might be misinterpreted by the algorithm, as each category is equally distant from all others in the encoding space. However, it also increases the dimensionality of the dataset, which can lead to the “curse of dimensionality” in cases with a high number of categories, and it may increase the computational cost. One-hot encoding is widely used for categorical data that doesn’t have an inherent order, and it’s a critical step for many machine learning algorithms to properly understand and process categorical inputs.
Here’s an example of how to perform one-hot encoding using pandas and scikit-learn. In this example, I’ll create a pandas DataFrame and then apply one-hot encoding to a categorical column.
Using Pandas
import pandas as pd

# Creating a sample DataFrame
data = {
    'Color': ['Red', 'Green', 'Blue', 'Green', 'Red'],
    'Size': ['S', 'M', 'L', 'S', 'XL'],
    'Price': [100, 150, 200, 120, 180]
}
df = pd.DataFrame(data)

print("Original data:\n", df)

# Applying one-hot encoding using pandas
one_hot_encoded_df = pd.get_dummies(df, columns=['Color', 'Size'], prefix=['Color', 'Size'])

print("\nOne-hot encoded data:\n", one_hot_encoded_df)
In the above example, the pd.get_dummiescolumnsprefix
Original data:
    Color Size  Price
0    Red    S    100
1  Green    M    150
2   Blue    L    200
3  Green    S    120
4    Red   XL    180

One-hot encoded data:
    Price  Color_Blue  Color_Green  Color_Red  Size_L  Size_M  Size_S  Size_XL
0    100       False        False       True   False   False    True    False
1    150       False         True      False   False    True   False    False
2    200        True        False      False    True   False   False    False
3    120       False         True      False   False   False    True    False
4    180       False        False       True   False   False   False     True
Using Scikit-Learn
Using the sklearn OneHotEncoder is very similar to LabelEncoder:
from sklearn.preprocessing import OneHotEncoder
import pandas as pd

# Creating a sample DataFrame
data = {
    'Color': ['Red', 'Green', 'Blue', 'Green', 'Red'],
    'Size': ['S', 'M', 'L', 'S', 'XL'],
    'Price': [100, 150, 200, 120, 180]
}
df = pd.DataFrame(data)

print("Original data:\n", df)

# Initializing the OneHotEncoder
encoder = OneHotEncoder(sparse_output=False)

# Fitting the encoder and transforming the data
one_hot_encoded_array = encoder.fit_transform(df[['Color', 'Size']])

# The transformed data is an array, so we need to convert it back to a DataFrame
one_hot_encoded_df = pd.DataFrame(one_hot_encoded_array, columns=encoder.get_feature_names_out(['Color', 'Size']))

# Concatenating the one-hot encoded columns to the original DataFrame
final_df = pd.concat([df, one_hot_encoded_df], axis=1).drop(['Color', 'Size'], axis=1)

print("\nOne-hot encoded data:\n", final_df)
In this scikit-learn example, we first initialize the OneHotEncoder and specify sparse=False to return a numpy array instead of a sparse matrix. Note: we could use the drop='first' parameter of OneHotEncoder to apply “dummy encoding” which drops the first category to avoid multicollinearity. We then fit the encoder and transform the ‘Color’ and ‘Size’ columns. The result is concatenated back to the original DataFrame, and the original categorical columns are dropped. Running this code should return the following output:
Original data:
    Color Size  Price
0    Red    S    100
1  Green    M    150
2   Blue    L    200
3  Green    S    120
4    Red   XL    180

One-hot encoded data:
    Price  Color_Blue  Color_Green  Color_Red  Size_L  Size_M  Size_S  Size_XL
0    100         0.0          0.0        1.0     0.0     0.0     1.0      0.0
1    150         0.0          1.0        0.0     0.0     1.0     0.0      0.0
2    200         1.0          0.0        0.0     1.0     0.0     0.0      0.0
3    120         0.0          1.0        0.0     0.0     0.0     1.0      0.0
4    180         0.0          0.0        1.0     0.0     0.0     0.0      1.0
Both approaches yield similar results, and you can choose either based on your preferences and specific requirements.